Feeds:
Posts
Comments

Archive for September, 2008

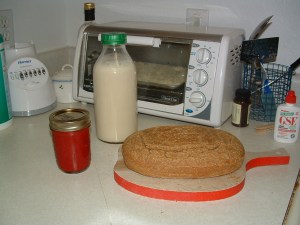
From left, strawberry jam, soymilk, quinoa-brown rice bread, with okara toasting in the toaster oven

From left, strawberry jam, soymilk, quinoa-brown rice bread, with okara toasting in the toaster oven

I sit down tonight with a glass of merlot and say to you, “Salud!” And boyohboy, are my feet tired after a busy, busy day of prep work for my fall SFG installation and especially, doing a lot of experimental cooking, which is mainly what today’s blog is all about. It’s experimental, because I haven’t made most of this stuff before, and some of it is a little different than what most folks are used to.

So what did I make today? Well, first of all, I made some yummy, easy and organic strawberry freezer jam made with stevia instead of sugar. The Ball folks (ya know, the ones that make the Ball jars for homemade canning), have come out with pectin that you can use to make freezer jam that requires absolutely no cooking. You just crush yer fruit, toss the pectin with some sugar (and in my case, stevia), mix with the fruit, put it in some half-pint jars, let it set for 30 minutes et voila – fruit jam! No cooking fruit, no sterilizing jars in boiling water, nada of the sort.

Specifically, what I did was I bought three 10-oz bags of frozen organic strawberries. You can also get 4 lbs of strawberries, but even if ya don’t buy organic strawberries, it’s still more expensive than buying them frozen. Here in Austin, TX, you can go down to yer local HEB and buy organic frozen strawberries for $2.49 a bag, which is pretty dadgum good for organic frozen fruit. Mind you, next year I plan on growing my own strawberries and making jam from that, but for now, I gotta get them from HEB, or some other grocery store with organic strawberries. It’s still cheaper than buying organic strawberry jam (that has extra sugar), which costs between $3 and $4, depending on where you go. I made organic, sugar-free jam for $2.37 each for 4 jars of jam!

In any case, I let the frozen strawberries defrost in the fridge for a day, then I ground them up in my blender and put them in a bowl. Then I mixed the freezer-jam pectin with a teaspoon and a half of pure stevia powder, mixed that into the strawberries, ladled the stuff into 4 half-pint jars and let them sit for 30 minutes. EASY!

 In case yer wondering what the heck is stevia, it’s an herb from South America that is very sweet, but has no calories, and no bad effects that chemical-based artificial sweeteners have, plus it helps balance blood sugar, which is helpful especially for diabetics. Read more about it at http://www.steviainfo.com/.

The next interesting thing I made was soymilk. Now, a few years ago, I thought the only way I could make soymilk at home was to buy a fairly expensive soymilk maker. I bought one, on sale for about 85 bucks or so. It worked great, but it was a bee-ach to clean. The filter inside it would get all clogged with little ground soybeans. Even with the special detergent the company that sold it provided, it was still challenging to make soymilk. I wound up not using the soymilk maker much, and finally sold it on Craigslist for 50 bucks back when I was a struggling graduate student and needed some money.

Well, turns out ya don’t need a fancy-dancy soymilk maker, and the clean up isn’t quite so bad, at least in my humble opinion. Here’s what ya do to make ya some good old fashioned homemade soymilk:

Soak 1 cup of organic soybeans 12-24 hours in at least 3 cups of water. Drain and rinse the soybeans after the soaking period. Put them in a blender with 4 cups of water, and blend until creamy. Then get you a big, deep pot and dump the soybean mixture into it and add 4 more cups of water.

Set the pot on the stove and turn the burner on high. Now, PAY ATTENTION! Keep yer eyes on the pot, because believe me, if ya don’t, that puppy is going to boil over, and yer going to have a big hairy mess on your hands (believe me, that’s what happened to me tonight — I didn’t pay attention and it boiled over, and I had a big friggin’ mess to clean up on my stove). Now, you do want it to boil almost to the point of boiling over, but not quite. When it gets to that point, turn the heat down to low and stir it til it goes down. Then turn the heat back to high, stand there and watch it, cuz it immediately will try to boil over again. When it does, turn the heat down to low again, stir til it goes down, then turn the heat back up to high, repeat, and repeat, and repeat, until it stops almost boiling over. It will take about 10 to 15 minutes to get to this point. If it doesn’t try to boil over for a couple of minutes while it’s on high heat, you are at this point. Then turn the heat to low and let it simmer, covered, for 10 minutes.

When this is complete, you need a colander with a metal screen and two layers of cheesecloth. I put this over the blender, and then I poured the milk through the cheesecloth and colander. What you are straining out is the soybean pulp, or okara, as it’s known in Japanese. You may want to put on rubber gloves to protect your hands from the hot pulp and squeeze some more milk out of the okara. I just took a spoon and pushed the okara with it to strain out extra milk.

Once you have strained out the milk, you can put it in a glass jar or bottle. I have a couple of actual glass milk bottles that I kept from some Promised Land milk I’d bought this summer when I needed some cow’s milk, and I put my freshly made soymilk into one of those glass bottles (cleaned in the dishwasher, of course!).

Now the next question is, wotta ya do with all that leftover soybean pulp? Well, first of all, fer heaven’s sake, don’t throw it out, or at least, if ya do, throw it out into yer compost pile, cuz it’s supposed to help make some really good compost! However, there are a jillion food items you can make with it. For more on what you can do with it, see http://ellenskitchen.com/clearlight/okara/okara.html and also, http://www.motherearthnews.com/Real-Food/1983-09-01/Okara-A-Meal-for-the-Asking.aspx and, one of my new favorite blogs, http://okaramountain.blogspot.com/. Just make sure that if you aren’t going to use it right away that you freeze it, because it is suppose to go bad fairly quick. And it’s probably best to toast it in the oven first to take out some of the moisture and then freeze it.

I’m experimenting with plain toasted okara, from which I can make any number of things, as well as the flavored toasted okara from the Ellen’s Kitchen site, which can be eaten like cereal. I plan also on making okara sausage patties and veggie patties, and using it in other ways as a cheap meat substitute. Apparently okara can be used much the same way TVP (texturized vegetable protein) can, but it’s much cheaper, and you have more control over how it is made, using organic, non-GMO soybeans. With a lot of TVP, you can’t usually get organic, and unless it says on the package, it probably isn’t non-GMO, and I just think that GMO products are pretty scary. Now that I know this about okara, and now that I’ve made soymilk, I’ll probably be making a lot more soymilk and okara-related food items. And I can get organic soybeans from Wheatsville for about 99 cents a pound, so I can have lots of cheap organic soymilk and okara meat substitutes!

The next wild thing I made tonight was quinoa-brown rice bread. It’s an interesting, gluten and wheat-free bread that tastes very similar to cornbread. Of course I love quinoa, and have used it often as a quick substitute for brown rice, as it cooks in about 10 to 15 minutes, and tastes (at least to me) much like brown rice. It’s the only grain that is a complete protein, and contains all the amino acids, plus it is also rich in iron and B-vitamins. It has been a staple in South American cooking for thousands of years, and was prized by the Incans who valued it for their warriors’ stamina. For more information, check out http://www.whfoods.com/genpage.php?tname=foodspice&dbid=142.

Anywho, I got the recipe for the quinoa-brown rice bread at http://pattycake.ca/recipes/quinoaricebread and didn’t vary it much except to use about ¼ tsp stevia powder, as opposed to agave. I think it turned out reasonably well. It is of course much flatter than wheat bread, but definitely tastes a lot like cornbread. It’s a great bread for those on gluten and wheat-free diets, and for those that don’t tolerate corn very well but love cornbread.

Well, that’s it for tonight’s blog segment. The next segment will likely be (though, no promises, it all depends on my mood, folks) on my fall SFG, where I’ll be planting lots of greens like kale, mustard greens, bok choy and spinach. Stay tuned!
Read Full Post »

I tell ya, raising veggies and fruit (and cats) is almost as nerve-wracking as what I imagine raising kids is. After a day at the old soul-sucking job, I get home, love on my furry babies, change clothes and go check on my green babies, and whatta ya know, I’ve got two more wilted squash fruits. Fear courses through my veins – is it the dreaded squash vine borer redux? I pulled off the very brown and wilted smaller fruit and dissected it — no larvae. Then I took the larger one, one of the many that I thought were fertilized and getting big, but that I’d noticed was looking kinda withered even when I got home from out of town earlier. Now it was looking sadder, though not brown and withered like the other one. First, however, I decided to remove my contacts and put on my glasses, because irony of ironies, as I get older, I get more farsighted with my contacts, but can still see OK with my glasses. I still needed to wait for my eyes to adjust to the glasses before I dissected the other fruit.

In the meantime, I poured over searches on squash bug, and found that squash bug just eat the leaves and vines, not the fruit so much. Then I read more about the borer. Supposedly butternut squash are pretty resistant to that, and the borer seems to also go more for the leaves and vines than the fruit. But I know I had larvae with the first batch of squash. Then I find out about pickleworm – ah, yes, they also produce larvae, and the larvae do like the fruit! But again, B-nut is suppose to be more resistant to that. But still, there are always exceptions, and I did have larvae the first time. I figured it might have been pickleworm then, and was worried that it was pickleworm, or borer, this time.

With my eyes good and focused, I took the other squash fruit and started dissecting it. Nothing, no larvae, nada, zip, zilch. There was still plenty of good fruit, unlike the other one I’d dissected, so it wasn’t like it had been destroyed and the larvae had moved on. There still should have been something in there still munching away. Also, no tell-tale entry holes.

Then it occured to me — is it possible that these fruits hadn’t been fertilized, and so were withering up like barren old maids? Did another search, and yep, that looks to be the case. I guess I had assumed that since I had a bunch of big healthy young female fruits when I’d gotten home from out of town that the male flowers had burst forth like hormonally driven teenage boys and had impregnated my girls while I was gone. But then I couldn’t remember any male flowers on the cusp of blooming when I left. Which may mean, unless some boys did indeed bloom when I was gone, that my four or five beautiful big young girls are gonna drop off too, wilting from lack of male attention. It is possible that some guys snuck over while I was gone, did their dirty work and dropped off before I got back, but we will just have to wait and see what happens.

There are male blooms starting to come out and mature now, but like the case with humans, there have been several girls that have blossomed forth and matured much faster than the boys have, of course. There are several baby girls starting to show their tiny green and curvy selves, but they are smaller than the boys, so I hope everybody gets it together and matures around the same time! I want some butternut squash dadgum it, and the more teen pregnancies I have here, the better! And no, we won’t talk about Alaska on this blog — I try to keep it apolitical here cuz I want everybody to feel welcome, Republican, Democrat, Libertine, what have you, though I do admit I’m waiting excitedly for a tee shirt, buttons, yard sign and car magnet from my favorite Chicago-area politician, and it ain’t Mayor Richard Daly!

Anywhoo, we’ll just have to wait and see. In any case, I hope my girls did get fertilized while I was gone. I was really hoping I had a good head start to some B-nut squash!

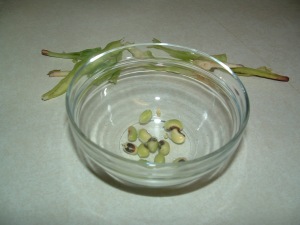
My meager b-eyed pea harvest

My meager b-eyed pea harvest

On another front, I’d forgotten last night to include an update on my black-eyed pea experiment. Well, as you can see, I did get a few pods, which I shelled, see pic to the right, though I think I picked them a bit too soon. I ate one raw, which was OK, but not great. I left the peas out and they just dried up, so I threw them away and put the pods in my compost pile. In any case, I realize that if I grow black-eyed peas I’m either going to have to use several seeds to get a decent harvest if I use seeds from peas I buy at the grocery store, or I’m going to have to buy a high-yield variety and plant that. I’m not sure even planting a whole 4×4 SFG with nothing but b-eyed peas from the bulk bin at the grocery store will produce enough to eat at more than one meal! But it was still fun to get some pods, and opening them reminded me of the time when I was about 11 years old visiting my grandparents on their cotton farm in West Texas. My Mamaw had a huge veggie garden, and that summer she had harvested a bunch of what I think were black-eyed peas, and then she taught me how to shell them. Course this time around I’d forgotten what she’d taught me, and didn’t remember til I shucked the last pod. Oh well!

This concludes this round of my garden update. I do have a goji berry bush and blueberry bush in containers, but they need another year before they start fruiting, and there’s not a lot to report there. And I plan to devote a future posting to goji berry in general, and mine own bush to some extent in particular.

Read Full Post »

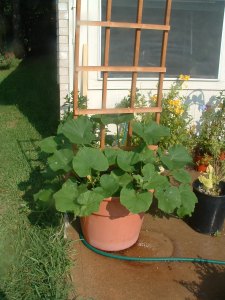
Them's some big squash leaves thare . . .

Wow, now if only the squash fruit gets just as big, I’ll have a fab crop of B-nut squash! I am so happy to report that after my failed first go-round with planting butternut squash in a large container earlier this summer, I’ve now got vines out the wazoo, with big, healthy leaves and lots of big healthy baby squash and squash blossums. It is truly amazing what some good fertilizer and vigilance will do!

It was really heartbreaking earlier when I first planted the squash seeds from an organic butternut squash I’d bought at Whole Paycheck, I mean, Whole Foods earlier this spring. It started out so beautifully. I got it on the trellis, and it started popping out some little baby squash, but then it started getting yellow in places, and some of the squash started shriveling up. It reminded me of the disappointing venture I had last year at the apartment when I tried to grow some container cukes. They did the same thing, and I’d thought then it was disease. But nope, turns out that the likely culprit of both devastations was a mean little critter called a squash vine borer.

Late at night and early in the morning these little pests land on the curb family (I’m using the abbreviation cuz I don’t think I can spell the proper name without having to look it up, which I’m too lazy to do), which includes all squashes and cukes, lays little dark eggs at the base of the plant, and when the eggs hatch, evil little larvae burrow into the plant, suck it dry and then crawl into the soil to mature. This bore (no pun intended) itself out when I pinched back a dying baby squash to find a groddy little larvae high-tailing it into the stem, hoping I didn’t see it — but I did. Then as I did research, I realized that the little dark specks I’d seen earlier on the stems were the eggs- wish I’d realized it then. I had no idea. And I’m certain this is what destroyed my cukes last year — the vines grew, and little cukes would come out, but they’d wither away before they had a chance to grow. And that was what was happening to my beloved butternut squash plant.

So with a heavy heart, I yanked them out of the container, grabbed a couple more seeds, let them soak in water about 30 minutes, and planted them again. I was determined to have me some B-nut squash this fall! This time I didn’t shield them from the sun, and this time they popped up, I think even faster than the other ones did. And man, did they grow fast! They were growing fast even before I decided to put some organic fertilizer I’d inherited from my next-door apartment neighbor when she moved. 

And then boy, did they explode! The leaves got huge, and so did the budding squash blossums. I’d decided to add fertilizer, because I kept reading that the healthier your plants, the more resistant they are to pest and disease. Now, don’t tell ol’ Mel B ( of SFG fame, not the Spice Girl) that I did that, cuz he feels that if you’ve got good compost, you shouldn’t need fertilizer. Now the compost I used in the container was some I’d had left that I’d bought from Whole Foods last year, and not the really great LadyBug Compost, which I used with the malabar spinach in my tiny SFG to great success. So ol’ Mel can rest assured that great compost gets you great healthy plants, while not-so great compost gets you so-so results. When ya got not-so-great compost, ya add some great organic fertilizer.

In any case, the fertilizer I used seemed to do the trick. Green, green vines and humongous green leaves,

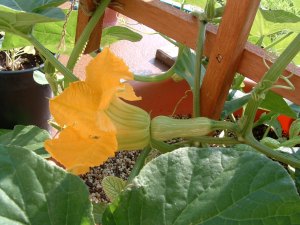
Beauty-ful yellow squash blossum

Beauty-ful yellow squash blossum & healthy baby squash

huge yellow beautiful yellow squash blossums and healthy baby fruit (see pic, right), and so far it seems, no infestation of squash vine borer! I have also made garlic tea and sprayed it periodically on the whole plant, which seems also to help a lot. I had to go out of town for a few days last week and contemplated putting row cover over it to protect it while I was gone, but I didn’t want my cat sitter to have to deal with removing it to water, so I let it go. The plant was still very, very healty when I got home, and the baby squash looks very healthy and is getting bigger by the day.

I had a little bit of a scare when I saw one of the squash looking a little withered, and I decided to go ahead and remove it, open it up and see if there was any larvae. I couldn’t find any. There may have been a squash bug (also known as stink bugs) that sucked on it. Those are a different sort of pesky squash critter that munch on the outside, as oppose to the inside, of squash. I also found on the backs of the leaves some patches of what looked like squash bug eggs. I sprayed the vine with garlic spray, and did my best to remove as many of the eggs off the leaves as I could. The vines weren’t that infested, and the eggs come of very easy and seemed to be destroyed just by rubbing them off the leaf. I will continue to be vigilant however, and look to have a successful crop this fall.

My next challenge, I think, will be managing the vines. Like the last time, I let both vines from each seed grow, even though Mel and the literature tell you to remove one of them. I just couldn’t do it. So now I gotta a lotta vine. Eventually, I may have to remove one, but I hope I can grow them both without too much trouble. But the vines are just growing like mad, and I’m not sure the trellis I have will be big enough. Then I’ll have to figure out how to support the squash fruit themselves on the trellis as they get bigger. I’ve read that if you’re trellising squash you can support the fruit with pantyhose(!), but I’m concerned that I’m going to have so much squash that there won’t be enough room to support them all on the trellis! It may just look like one big pantyhose convention as it is! Not that I’m complaining — I love butternut squash, and will be happy if I can grow a ton of it. It would be nice, however, if I could find pix of butternut squash, or other big winter squash growing on a trellis to see what others are doing. I also wonder if the vines can be trimmed? I need to find that out as well. If any of you readers know, please, pretty please with squash on top, leave me a comment below.

It does excite me, in my little B-nut squash experience that thus far: 1) I’ve been able to grow big, healthy vines from seed I saved from organic produce I bought and 2) that I’ve been able thus far to grow it in a container. When I started out in this experiment, I couldn’t find much on how to grow one in a container, only that it might be possible with a large container. Also, I wanted to do this as much for others who can only grow things in containers, like apartment or condo dwellers, or those who can’t bend down to garden, as much as for me, and I want others to see that you don’t need yardage to grow veggies and fruits.

Before I even got the house, I aspired to become self-sufficient even in an apartment, and my original idea and goal was to show how anyone, anywhere, can become self-sufficient. I had already started to do some container gardening at my apartment, and was looking to expand further. The house came to me as an unexpected blessing and surprise, and enabled me to expand my horizons to urban farming in an urban backyard, utilizing square foot gardening, and perhaps other methods, like lasagna gardening, and Mittlieder gardening that I hope to experiment with later. But, partly because I wasn’t ready to do full-on-out urban gardening and SFG, and partly because I wanted to help those who can only do container gardening, I decided to do things like try to grow butternut squash and black-eyed peas from seeds saved from organic produce at the store in containers, and grow malabar spinach and fruit (like dwarf pomegranate, blueberries and goji berries) in containers, along with my SFG experiment with the other malabar spinach plant and basil.

In any case, I hope that as I experiment others can learn from what I am doing and become inspired to do some gardening, and even become more self-sufficient, as I am doing. Right now we are living in some challenging times economically, environmentally, health-wise, etc., but these challenges are providing us with some really fab opportunities. More people are taking up urban farming and learning to rely less on the grocery store and more on themselves, while saving money, the environment, their health, and heck, maybe even their souls! I know that it has given me a wonderful passion that has enriched my own life and soul, and that I know will continue to deepen as I garden more and more and do more things to become self-sufficient. I am excited about this little adventure that I am on, and I hope you get inspired to embark on your own!

Ah-hum . . . well, guess I got a little carried away there. But, to partially quote one of our former local deli owners in a commercial he did for years and years — I just can’t help it! I gotta tell ya!

And now, inspiring speech over, I gotta go to bed! 😉


Read Full Post »